Follow us on
Instagram
CE certified Class 1 medical devices
dispositivi medicali certificati CE Classe 1
info: alberto.bottacini@hcs-italia.it
HCS Italia +39 389 067 3169
workflow with Toltac® System
1. data acquisition
It is recommended to always perform the CBCT examination with a radiographic template to facilitate the matching process with the stl files of the scans during planning and to perform intraoral scanning or of the models so as to have wide gingival margins around the area where the surgical template will be located.
In the case of complete edentulism, it is preferable to make a duplicate of the pre-existing prosthesis with radiographic findings and freshly relined or at least a freshly relined base plate on which to apply the diagnostic template during the CBCT scan to stabilise it; it will then allow a model to be made for the planning scans and on which to test the accuracy of the surgical template. The authorised Toltac® technicians are available to design together with the clinician the diagnostic systems (wax-ups, templates, duplicates, etc.) most suitable for their case, to make the operative procedure smoother and simpler in the diagnostic and surgical phases.
2. template test
If possible, schedule a session before surgery in which the template is tested on the patient to verify its accuracy and stability.
If you have the original model of the arch to be treated (the conventional impression plaster model on which the scan was taken or a 3D-printed model of the intraoral scan), the template can also be tried before the test on the patient.

Template's test on the model

Template's clinical test
3. surgery
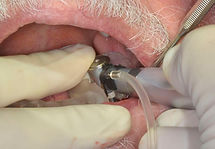
If planned, prepare the surgical flap as you prefer, fix the template carefully checking its correct positioning through its inspection windows. If preferred, you can fix the flap sides to the template with a suture and have a "freehand" flap's retraction. If on the other hand you planned a flapless intervention, you can guide also the mucose punch with Toltac®.
Implant site preparation with the help of Toltac®.
As first, use the Toltac® unidirectional 5.5 mm driver to drive a long necked pointing drill (e.g. sphere, lanceolate...) and by inserting it into the sliding furrow of the Toltac® guide carefully mark on the bone surface the position of each planned implant.
If the mouth's opening of the patient is not wide enough, use a Toltac® flat driver carefully.
Follow your usual freehand surgery's workflow just fixing the Toltac® driver to every drill's neck before using it. Toltac® driver is asymmetric (its guiding portion has a long and a short end), thus you can select the position you prefer (normal or upside-down) in order to engage the Toltac® guide more or less early. You can decide it during surgery, by simply changing the driver's orientation according your needs and according the size of each drill you are using.


driver in normal position or upside-down
If you feel that the Toltac® standard driver would need a bigger mouth's opening than your patient has, you can select the Toltac® flat driver in order to proceed with surgery.


Toltac®
flat driver
Toltac®
unidirectional driver
Safety checks.
The view of the surgical site provided by the Toltac® system allows the depth of the implant preparation to be checked with normal measuring probes to verify that the desired depth has been reached.

Implant insertion.
You can fix your implant by guiding its holder with a Toltac® driver or, if you prefer, by freehand technique. In this case, if you feel it more comfortable and your implants are not too aggressive (=they passively follow the prepared implant's site) you can remove the template before inserting the implants.
Visual alignment of the mandrel with the Toltac® guide enables the correct direction to be maintained during manual implant insertion


A USEFUL TIP. To increase the precision and operating comfort of the procedure, it is very useful that a finger of the surgeon's hand not holding the handpiece is used to push the handpiece head and/or the part of the Toltac®driver not engaged in the Toltac®guide, helping it to move in an axial direction: in this way, both hands will help to hold the bur in position and facilitate its descent into the site under preparation.
Toltac® gives you much more but never changes your habits. You can have an help in flap's retraction, in the implant's site preparation, in the implant's positioning. For all implants or only for some. For all drills or only for some. It depends on you, on the help you need in each case and in each moment.